Monday, November 21, 2016

Not able to see which user skipped assignment of approving the requisition

Issue Description:-

If approver skips the assignment of approving the requisition by selecting 'Skip current assignment.The tree is reloaded and that approver name does not reflect in the tree.

The initiator can not know who among the approvers skipped the assignment.


Solution
When an approver skips taking action (approve/reject) on the task, action history would not display the approver's name. If approvers should not be skipping the action, it can be disabled in BPM > Task Configuration > Access. Expand Action and find the row corresponding to 'Skip Current Assignment' (see attached), you can uncheck all or just have the action allowed only for the 'admin' user.

Supplier Qualification

How to create custom Questionnaire report - Report of  Supplier Name and Supplier Questionnaire -

Answere -
'Supplier Qualification - Qualifications and Assessments Real Time' subject area.

The supplier and questionnaire information are under the Initiative -> Questionnaire Response Headers folder and the questions and responses are under the Initiative -> Questionnaire Responses folder.


Wednesday, November 9, 2016

Duplicate Supplier Checks Functionality

Functionality -

When we create a new supplier, if the name matches to that of an existing supplier, the match percentage along with the existing records are displayed. Even after completing the required setups, we are not able to see the matches.


1. You should find the TOI presented in the link below useful. In addition the online help should have details under the help topic Enabling Supplier Match: Explained

http://download.oracle.com/ocomdocs/global/fusion_r9/prc/Supplier_Data_Quality_Management/index.html

Supplier match feature leverages Fusion Enterprise Data Quality (EDQ) which provides data quality services for Fusion Cloud applications. The duplicate supplier match feature is available to Fusion Cloud customers only, and is not supported for customers deploying Fusion Supplier Model on premise. We are a Fusion Cloud customer.

I reviewed Fusion documentation on how to configure the supplier match feature and I think there might be one of the many cases where the documentation is missing key information. Do you think that there is a process that needs to run after completing step 2? Note that I executed step 3 in a different browser.

Step 1: Configure party relationships for supplier match. See screenshot 1 in attachment.

Step 2: Manage data quality server configurations. I enabled the EDQ Realtime and Batch Basic Match fields. See screenshot 2.

Step 3: Manage enterprise data quality matching configurations. I performed a test of the configuration and exercise the EDQ matching engine. No results were returned. See screenshots 3, 4, 5 and 6.

For example, there is already a supplier created for 'Midtown Computer Supplies'. I performed a test of the configuration by entering 'Midtown' in the PartyName field and exercised the EDQ matching engine. No results were returned. I then tried 'Midtown Computer' and 'Midtown Computer Supplies' and still no results were found.

Then I tried another route. I navigated to the Register Supplier page and called the new supplier 'Midtown' and then 'Midtown Computer' but did not receive a supplier match warning message. Only when I enter 'Midtown Computer Supplies' is when an error message displays indicating a duplicate supplier exists. That said, I think the error message is separate from the supplier match feature. It is the same type of error message you receive when you enter a duplicate tax id.


If you will not find the task name then use Manage servers Task Name and do rebuild Index.


Search All requisitions created by all users

1. Login to APM (you can get to it through "Manage Duties" task in fusion application)

2. In the Search dialog, choose "External Roles" next to "For" and search for Job Role 'Advanced Procurement Requester'

3. Select Job Role from search result, and choose View.

4. Once Role is opened in a separate tab, navigate to "Application Role Mapping" which lists all Duty Roles for all stripes like fscm, hcm, crm and obi.
- Then you can follow the rest of the last action plan:
- Select FSCM, click on Map icon.

5. Search an application role by setting following parameters in search:

Application -> FSCM Role Name -> POR_REQUISITION_VIEWING_AS_ADMIN_DUTY


6. Map this application role.
(You can verify that this contains necessary policy too)


2) Can you please ask customer to verify if the 'View Requisitions - All'
target is associated with 'Requisition Viewing as Administrator¿ duty role.
Steps to verify:
a) Click on the 'Requisition Viewing as Administrator¿ in Application Role
Mapping
b) Open role and click find policies
c) Should be able to see all targets associated.
.
3) Can you please ask customer to add duty roles ¿Requisition Viewing as
Administrator¿ and ¿Requisition Reassignment as Administrator¿ to Advanced
Procurement Requester Role corresponding to the default Business Unit. i.e
'Advanced Procurement Requester <BU name>' and verify the issue?


The error reported in step 6 is expected because through the recommended
steps , you were trying to add the duty
POR_REQUISITION_VIEWING_AS_ADMIN_DUTY, which already was present under fscm
mappings.
However, sr_ans_3.1.PNG shows there are 2 such roles present.
POR_REQUISITION_VIEWING_AS_ADMIN_DUTY and
ORA_POR_REQUISITION_VIEWING_AS_ADMIN_DUTY with same name Requisition Viewing
as Administrator Duty
1. Can you verify in Authorization Policies, that
ORA_POR_REQUISITION_VIEWING_AS_ADMIN_DUTY also contains a Functional policy
with Target 'View Requisition - All' ?
2. If yes, provide a screenshot for this page and skip to step 4.
3. If no, can you try adding it? Steps-
   Add a policy with name 'Policy for Requisition Viewing as Administrator
Duty',
   Switch the radio button named Match under Principals to All,  
   Add a target with entitlement name (contains)
POR_VIEW_REQUISITION_ALL_PRIV
After this is added, navigate to Authorization Policy and provide screenshot
such that newly added Functional Policy can be seen.
4. Now, Can you remove the role 'Requisition Viewing as Administrator' under
fscm of type ORA_POR_REQUISITION_VIEWING_AS_ADMIN_DUTY (which is already
present) and add the one with name ORA_POR_REQUISITION_VIEWING_AS_ADMIN_DUTY
? (from same location as provided in file sr_ans_3.1.PNG )

Setting of Country, State, City LOV in Manage Supplier Screen


Task Name -

Oracle Sales Cloud > Getting Started with Oracle Sales Cloud Implementation > Setting up Geographies Reference Data for Territories and Addresses

Please review - http://docs.oracle.com/cloud/farel10/salescs_gs/FASMC/FASMC1432334.htm#FASMC1432334

You can see that if you select US as country, you will get the drop down, You can do the setup for your country also by importing that data with above shared documents.

After importing the data, In FSM, go to task Manage Geographies and search for your country. Then go to the corresponding Validation Defined for given country. This page will allow user to choose whether to enable list of values for Province or impose validation.


http://docs.oracle.com/cloud/farel10/salescs_gs/FASMC/FASMC1432334.htm#FASMC1705402

Monday, October 3, 2016

Enable Budgetary Control

Manage Budgetary Control -


Query -

Customer wants to enable Budgetary Control only for requisitions but not for PO. On documentation it is stated that if we have enabled the budgets for a specific business function, the downstream applications are automatically enabled. Is there a way to enable Req Budgetary Control alone? 

Solution - 

It's not possible to disable budgetary control for downstream transactions. Currently, Purchasing only supports budgetary control for standard purchase orders.


Setup for Time Zone

1. Validate Site level profile option - XLE_ENABLE_LEGAL_ENTITY_TIMEZONE
2. Validate Manage Legal Entity time zone.
3. Validate Manage Locations time zone.
4. Validate Set User General Preferences time zone.
5. Manage Legal Address Timezone

Sunday, October 2, 2016

Need JobList data element info for Supplier Import Submission WebService

Need JobList data element info for Supplier Import Submission WebService          

Problem Desc

Under procurement cloud R11 , customer is using FBDI , "loadAndImportData" operation to upload CSV file of import Suppliers to ERP cloud .

WSDL: https://edpe-test.fin.us2.oraclecloud.com/publicFinancialCommonErpIntegration/ErpIntegrationService?WSDL

Operation : loadAndImportData

<oer:parameter name="jobList" description="List of elements, each containing the details of the ESS job to be submitted to import and process the uploaded file. The details include the job definition name, job package name, and list of parameters."/>

Not able to find required jobList payload details for "import Suppliers "
The Attached document shows the information for Journal Import. Customer is looking for similar info for Supplier Import. Please advise.         


Solution
Looks like customer expects the package name, job names and parameter list for supplier import. Here are the details, let is know if you need anything else:

Package Name: /oracle/apps/ess/prc/poz/supplierImport

Job Names:
ImportSuppliers
ImportSupplierAddresses
ImportSupplierContacts
ImportSupplierBusinessClassifications
ImportSupplierProductsandServicesCategory
ImportSupplierSites
ImportSupplierSiteAssignments

so in the service, this shall be used to import addresses: <ns2:JobName>/oracle/apps/ess/prc/poz/supplierImport,ImportSupplierAddresses</ns2:JobName>

For the parameter list, use - first option as New, All, Rejected and for second option use Y or N.
example: <ns2:ParameterList>NEW,Y</ns2:ParameterList>


Operation: loadAndImportData

The loadAndImportData operation uploads a file to the UCM server based on the document specified and submits an ESS job to load and import the uploaded files to an application table.
The following table lists the parameters for this operation:
Parameter
Name
Description
Parameter
(In/Out)
Mandatory
Type
Document
List of elements, each containing the details of the file to be uploaded. The details include the file content, file name, content type, file title, author, security group, and account.

Document Attributes:
       Content: File content uploaded on to the UCM server. The value of the content tag is obtained by converting the file content into Base64 encoding.
       FileName: Name of the file on the UCM server.
       ContentType: Type of the content file format uploaded, such as.zip, .txt, or .csv.
       DocumentTitle: Title of the file on the UCM server.
       DocumentAuthor: Author of the document.
       DocumentSecurityGroup: A fixed value used to import or export documents on the UCM server. The security group for all the import processes is FAFusionImportExport.
       DocumentAccount: Account under which the file is uploaded..
IN
Yes
java.lang.String
Joblist
List of elements containing the details of the ESS job used to import and process the uploaded file. The details include the job definition name, job package name, and list of parameters.
IN
Yes
java.lang.String
Interface Details
The interface identifier of the specific product interface table to which data is loaded.
IN
No
java.lang.String
Notification Code
A two-digit number that determines how and when a notification is passed for the status of the import job. See the table below for the notification code values.
IN
No
java.lang.String
Callback URL
The callback URL of the specific web service implemented by a customer to receive the ESS job status upon job completion.
IN
No
java.lang.String
Response Code
The response code that returns the request identifier for the first import job in the joblist.
OUT

java.lang.Long


Note
If the file upload to the UCM server has failed, then the rest of the ESS jobs are not executed and the response code will return as 0.

The notification code key information is outlined in the table below:
Digit Position
Digit Value
Meaning
First digit
1
E-mail notification
2
Bell notification
Second digit
0
Send in any case (import failed or succeeded)
1
Send on import success
2
Send on import failure

The following sample payload illustrates the Journal Import process:

<soap:Envelope xmlns:soap="http://schemas.xmlsoap.org/soap/envelope/">
     <soap:Body>
          <ns1:loadAndImportData xmlns:ns1="http://xmlns.oracle.com/apps/financials/commonModules/shared/model/erpIntegrationService/types/">
               <ns1:document xmlns:ns2="http://xmlns.oracle.com/apps/financials/commonModules/shared/model/erpIntegrationService/">
                    <ns2:Content>UEsDBBQAAAAIAHSsJUWkOHOwFAEAAHgDAAAXAAAAQXBJbnZvaWNlc0ludGVyZmFjZS5jc3bV0U9LwzAYBvC74HcIO3h61+XN/xzrqlLRItYJHivmUOzKbFJEP73p1sEQymDgwef0HB5I8gtKREop5Nc35LL3deu8J6u2DrC8S/P7EnAcKGtpwoBRFAtkC6ohOB9cG1y36WrvyGvVvpMLErreB1BMCo1gmNWaw6rM4AOgfEqLLH3MAKSao+TGSgVp8QL5eu3e6io4iNmfwHHsVA/9oE4EId6TMso0p3OEZGp3Qq6K7PxsK8HtEao4QC4Hsd1D6J5qU/UNCRHJdb5xX5HIcKRguBZsR1QdEnE1Z8oKI6aIRosTiFCgjD/A/ohI8CNEcSDVb6LZYPRcu4Y8JGRZ+U/XNEBuu2Q2SGkuo5SRUmylvv+91A9QSwMEFAAAAAgAM4YNRYXONvBWAAAAxQEAABsAAABBcEludm9pY2VMaW5lc0ludGVyZmFjZS5jc3YzNDU0NDAw0DHU8Qxx9dUxs7Q00DPSAYJCHWRgqKNjZGBoom9sqG9grkNT4OrnwstlCHKWsSXMWYbGpiBHAkEiilqjgXCWiTHMWaZmMGdVoag1prOzAFBLAQIUABQAAAAIAHSsJUWkOHOwFAEAAHgDAAAXAAAAAAAAAAEAIAAAAAAAAABBcEludm9pY2VzSW50ZXJmYWNlLmNzdlBLAQIUABQAAAAIADOGDUWFzjbwVgAAAMUBAAAbAAAAAAAAAAEAIAAAAEkBAABBcEludm9pY2VMaW5lc0ludGVyZmFjZS5jc3ZQSwUGAAAAAAIAAgCOAAAA2AEAAAAA</ns2:Content>
                    <ns2:FileName>TestUploadFileName.zip</ns2:FileName>
                    <ns2:ContentType>zip</ns2:ContentType>
                    <ns2:DocumentTitle>LoadandImportCallbacktest</ns2:DocumentTitle>
                    <ns2:DocumentAuthor>finuser1</ns2:DocumentAuthor>
                    <ns2:DocumentSecurityGroup>FAFusionImportExport</ns2:DocumentSecurityGroup>
                    <ns2:DocumentAccount>fin$/journal$/import$</ns2:DocumentAccount>
                    <ns2:DocumentName></ns2:DocumentName>
                    <ns2:DocumentId></ns2:DocumentId>
            </ns1:document>
               <ns1:jobList xmlns:ns2="http://xmlns.oracle.com/apps/financials/commonModules/shared/model/erpIntegrationService/">
                    <ns2:JobName>/oracle/apps/ess/financials/generalLedger/programs/common,JournalImportLauncher</ns2:JobName>
                    <ns2:ParameterList>1061,Expenses,1,ALL,N,N,N</ns2:ParameterList>
                    <ns2:JobRequestId></ns2:JobRequestId>
            </ns1:jobList>
               <ns1:interfaceDetails>1</ns1:interfaceDetails>
               <ns1:notificationCode>10</ns1:notificationCode>
               <ns1:callbackURL>#NULL</ns1:callbackURL>
        </ns1:loadAndImportData>
    </soap:Body>
</soap:Envelope>
Figure 3. Sample payload for the Journal Import process.

Wednesday, September 14, 2016

ACCRUAL RECONCILIATION REPORT FOR RECEIPT ACCOUNTING GENERATING NO OUTPUT

he Accrual Reconciliation Report is not fetching the purchase order details which are already received but not invoiced.


Please ask the customer if they have run the following processes before
submitting the Accrual Reconciliation Report:
1.Create Accounting
2.Match Receipt Accruals

Tuesday, September 13, 2016

Supervisior Hierarchy with No value at the some approval level

We are having customer, need your insight to fulfill his requirement -

Customer using the approved UI when creating approval rules.

He is building a Requisition approval rules based on a Supervisor Hierarchy, and He need to use the "Requester Level 4 Supersior" field in order to match the client's logic.
The issue is that, not all of the future requesters have a Level 4 Supervisor, so the the entire approval structure fails when ever a requester without a level 4 supervisor is trying to submit a requisition, since the system cannot compare "IS IN" or "IS NOT IN" values to NULL.

So the question is: is it possible to use SQL functions (like NVL) within the approval rules in order to prevent an error?
For example: NVL("Requester Level 4 Supersion",1) IS IN ('John', 'Tom', 'Jason').

Could you please help us to capture this requirement.

Answere -
In order to avoid the error, can they add a 'is not blank' condition in the approval rule and re-try the same use case ?

The "is not blank" condition must come before the "equals" condition.

e.g Requisition Amount Equals 80 and Requester Level 4 Supervisor Is not blank and Requester Level 4 Supervisor Equals LastName,FirstName

Thursday, September 8, 2016

How to override the charge of account at requisition to enter it manually

Approve is able to change the charge account however it does not get saved even after clicking save or submit button for Requisition Approval.

Customer is using default charge account rule but only natural account segment they have used the mapping set.

Answer - 

Based on your current set-up, the behavior of the system is

1) Derive a complete charge account (either automatically or from what user has entered depending on the configuration of your charge account rule)
2) Override the Natural Segment of the account derived from step 1.

This means - the Natural Account segment of the charge account entered by the Approver will be overwritten. To prevent this, you need to add the following condition to your mapping set rule (i.e. the segment overlay rule) - "Requisition Charge Account"."Natural Account Segment" Is not.

How it works - 
The above condition is saying - only trigger the rule inside the segment overlay rule(i.e. the mapping set) if there is no manually entered value for the Natural Account Segment. This means if user has manually entered a charge account, the rule will not be triggered and user's entry will not be overwritten.

When a user manually enters a charge account, the source for such manual entry is known as 'Requisition Charge Account'

Case 2 
Hi Team,
Currently customer implementing the production environment and there was a requirement from client to edit "requisition charge account" manually.

I found the solution in below note

(Segment Combination Cannot Be Saved On Purchasing Requisition Line Distribution (Doc ID 2077390.1))

Solution
Before you can apply the solution you are referring to, your setup needs to be the same as the setup for that solution. For that solution, the client had a segment overlay rule. When you have a segment overlay rule, then after TAB derives a complete charge account, it will trigger the segment overlay rule which will then replace a specific segment (Natural Account in this specific instance) in the just derived charge account combination. The client did not want this overlay to happen when a user has manually entered a charge account.

Normally, the solution to the problem would be to add a rule (see steps below) with a condition "Requisition Charge Account".<<SEGMENT_NAME>> Is not null as a first rule but due to a bug, the workaround was to use the condition "Requisition Charge Account"."All" Is not null.

Steps to adding a rule
a) Edit your custom charge account rule (Manage Account Rule > Purchasing > [YOUR_CHARGE_ACCOUNT_RULE]
b) The charge account rule consists of multiple rules (you will see these when you open it up for edit). Add a rule (first rule) with Source = Requisition Charge Account and condition = "Requisition Charge Account"."All" Is not null

Wednesday, September 7, 2016

How to setup TAD when using Fusion Projects

SR 3-11875360031
CENTRAL FLORIDA INVESTMENTS INC

Customer want to setup one accounting rule for both Projects and Non Project related requisitions.

customer has two accounting rules
1. For Purchasing which derives the account based on Item Category
2. For Projects related requisitions

Which works fine for both Independently, but customer is trying to create one Rule which works for both Project and non-project related requisitions

Can you please advise on how to do this setup? Uploading the screen shots showing the current setup they are having on their instance.

Research
======
How can we use Transaction Account Builder(TAB) for project related Requisitions and Purchase Orders? (Doc ID 1955590.1)
PJC: Unable To Access Project Fields On Project-Related Payables Invoice Distribution Line and Can't Setup Transaction Account Builder(TAB) For Projects (Doc ID 1490691.1)
PJC: Create Accounting In Error When Source 'Project Class Code' Value Set In Manage Account Rule (Doc ID 1914752.1)
PJC: How To Navigate Or Find Manage Subledger Applications For Scope Task To Set '‘Project Costing’ Scope (Doc ID 1536294.1)
Transaction Account Builder in Oracle Fusion Procurement (Doc ID 1507175.1)

Answer -
Hi Ramesh,

It looks like you are ONLY overlaying the Account segment for both project and non-project related lines. To combine all the rules, you should do the following

1) Creating a new account rule of type 'Segment'
2) In the Rules section, create the following rules

  • Rule 1 for Project related lines and it will have the following condition -* "Destination
    Type Code"(PO) = EXPENSE 'AND'
    "Expenditure Organization ID" Is not null
    * . The value type for this rule will be Mapping Set and it will point to the Mapping Set you have created for your projects.
  • Rule 2 for non-Projected related lines and this will not have any condition. The value type will also be mapping set and this will point to the Mappping Set you have created for item category

3) In your Transaction Account Defintion, specify the rule from step 2 above as your Account Segment overlay rule

The explanation is this -

a) The system will first derive a complete charge account based on the account combination rule in your TAD

b) Then the system will call the overlay segment rule. The system will check Rule 1 in your overlay rule. It says to check if the line is of type expense and also has an Expenditure Org ID (you get this when you specifiy Project Details for the line). If the conditions are true, it will look at the attached mapping set and will not call Rule 2. If the conditions are false, it will move to Rule 2

Monday, August 22, 2016

Populate cost center segment on PO Charge natural account without Mapping s

We need to know how to populate the cost center segment on PO Charge natural account without creating a mapping set.how can a cost center rule be created to assign Location Code as Cost Center segment on PO Charge Natural account field on requisitions and purchase orders?

We want to accomplish this without a mapping set since cost center segment exactly matches with Location Code. Also since we have many location codes we do not want to maintain the mapping set.

Solution -
We found a possible solution.
We assume when the customer says location they mean Deliver-to Location. That's the only location segment source for TAB.
If they mean for other things, the solution may not work.

First, go to manage accounting flexfield, find the value set for cost center segment. Here let's say it called VS1.
Second, create a new account rule, the rule type is value set and VS1 is the value.
Then, create a rule,value type is source, the value is Deliver-to Location and put a reasonable condition.
Last, If you're using the original TAD, we suggest creating a new one. Put the the account rule in for charge account and cost center.

Friday, August 19, 2016

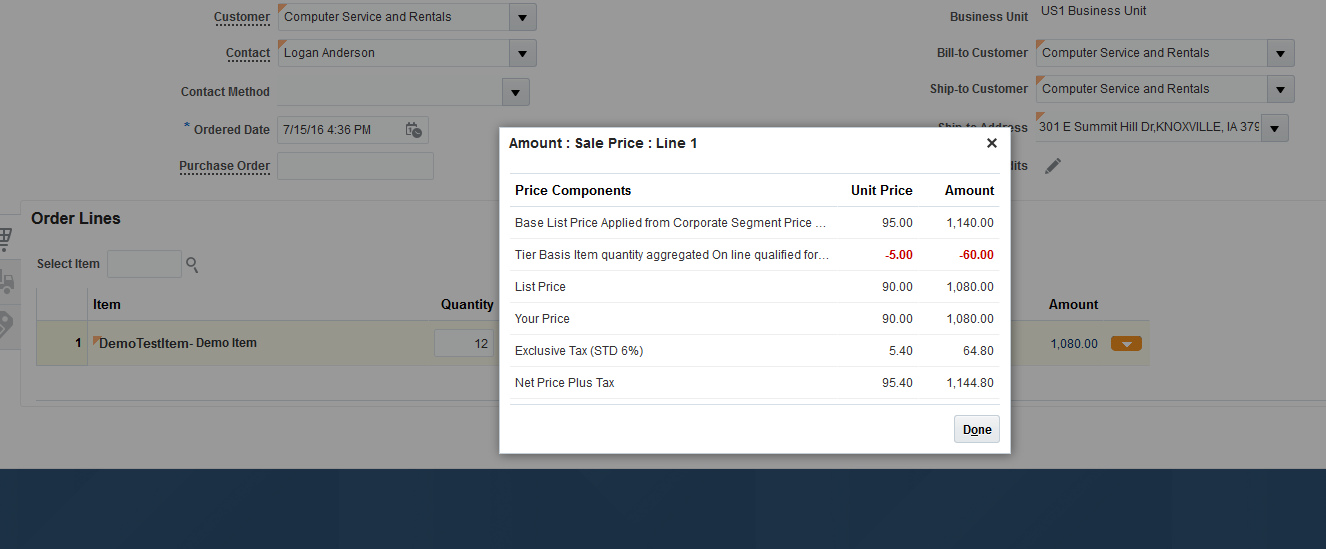
Error occurs when maximum quantity is not entered in Tier Based Discounting


Steps -

1. Login to the Application
2. Click on Pricing Administration
3. Click on side picklist and navigate Discount Lists (Assuming that the existing Discount List is connected to Strategy and other pre-reqs are done)
4. Now, search for a discount list and select an item
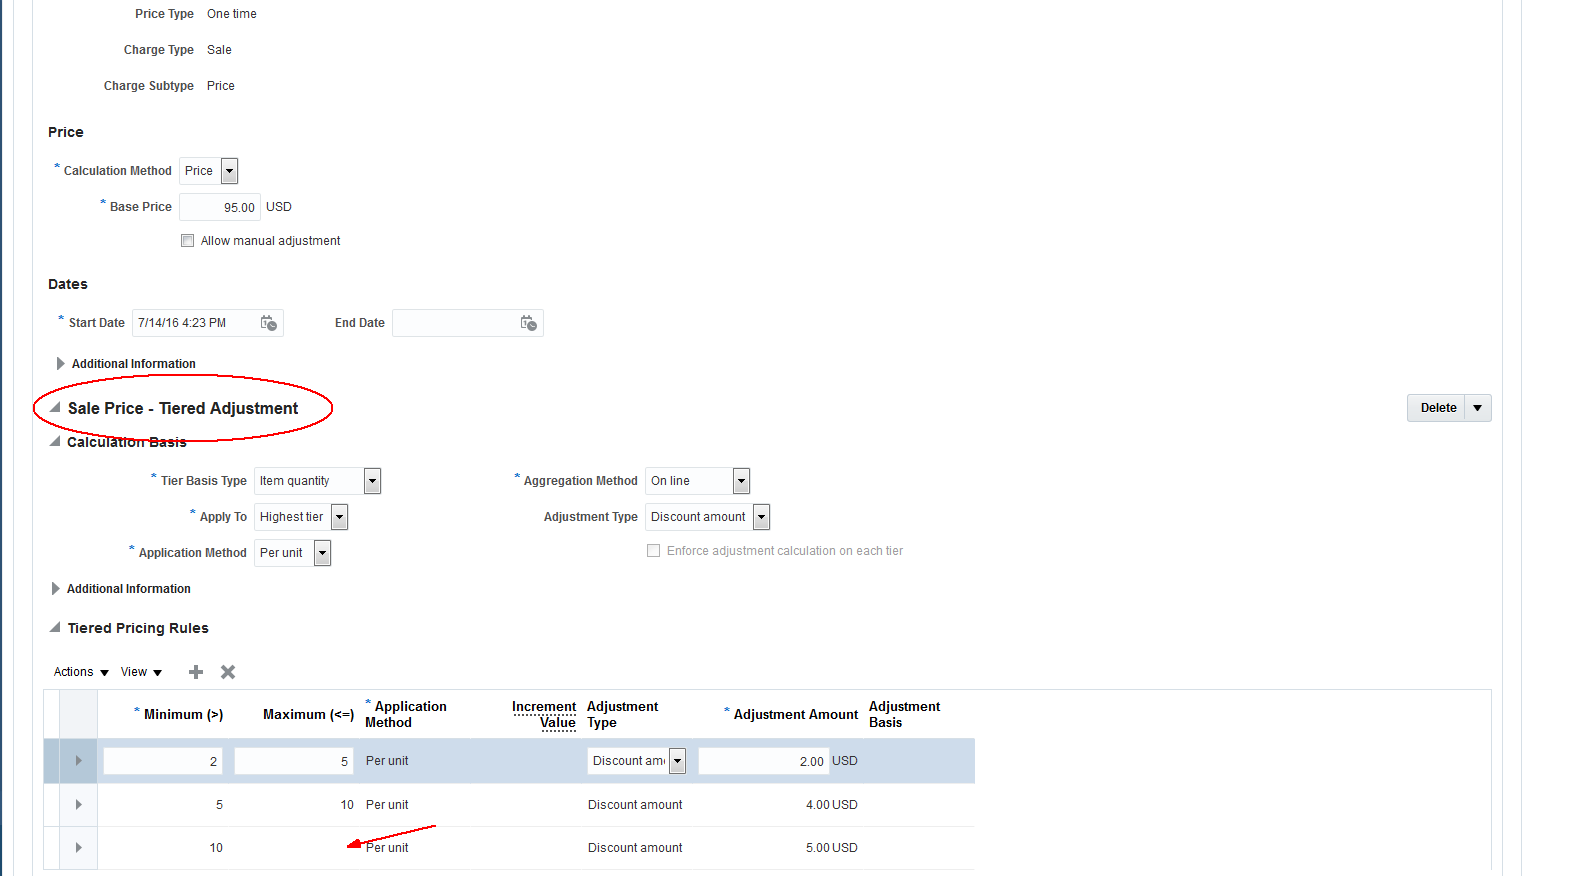
5. Click on Add Charge and select Tier Based Discounting
6. Create min as 2 and max as 5, application method: per unit and adjustment value as 3 USD
7. Similarly min as 5 and max as 10 ,application method: per unit and adjustment value as 4 USD
8. Min as 10 and do not give any max value (as max value is not a mandatory term here)


Wednesday, July 27, 2016

How to control reminder invitation e-mails for RFQ?

Requirement-

The customer want to stop or set interval of invitation e-mails for RFQ. It might be able to be modified on Task Configuration of BPM. But, we are not sure which tasks we should modify reminder settings.
Could you let us know which tasks should we modify?

Answer -

For human task notifications, you can change the reminder settings for InviteSupplierRequestForAction task via BPM Worklist. Changing reminder settings for ATK emails is not permitted. ATK emails are ones sent to additional supplier email specified in negotiations.

Alternatively, negotiation invitations can be turned off using notification subscription task, 'Manage Sourcing Notifications'. You can access this task from Setup and Maintenance.

How to change contents of email sent to supplier?

Requirement -

Need to change contents and rearrange some links shown on the email that is sent out to the supplier when a Negotiation is approved.
How to change the Email body - add more details, change content of the email subject ?

you can customize the notification content for notifications sent to suppliers using page composer. The user must be an admin user and access notification by logging into the Oracle BPM Worklist application. See http://www.oracle.com/webfolder/technetwork/tutorials/tutorial/cloud/r11/wn/r11_procurement_wn.htm#_Toc443569445

Answer

We followed the action plan provided by http://myforums.oracle.com/jive3/thread.jspa?messageID=8966423&#8966423.
"After logging into the BPM worklist application, select 'Administrative Tasks' in the tasks options on the left. Then open the notification you want to customize. If you have logged in as the Procurement Applications Administrator, you should see a link called 'Edit' on the top left side of the page. Once you click that, the notification opens into the Page Composer mode, and you will be able to customize the content as allowed by the Page Composer. Note that you do not need to go to the Administration view (as you can see in your attached document) for this. Simply open the notification from the worklist.
Document:
http://www.oracle.com/webfolder/technetwork/tutorials/tutorial/cloud/r11/wn/r11_procurement_wn.htm#_Modify_Supplier_Notifications

Now If you want to only update the text displayed on the BPM notification and ensure that it is translated, you can do it via the Customize User Interface Text tool. You can also update the text included on the e-mail with the Customize User Interface Text. You must be in a properly configured Sandbox to use the User Interface Text editor tool. It can be accessed from the Navigator > Tools > User Interface Text by an Application Administrator.
This document Extending the Applications for Functional Administrators ( https://docs.oracle.com/cd/E56614_01/common_op/OAEXT/toc.htm ) explains how and when to use the Page Composer and the Customize User Interface Text tool to extend Fusion application pages."

1st Option:
In BPM we override the text but after coming back it not reflecting. It is taking the old text.
Also We are not able to move the content or add a new content

2nd Option:
Navigator > Tools > User Interface Text by an Application Administrator
But nothing happening.

Alternatively

After logging into the BPM worklist application, select 'Administrative Tasks' in the tasks options on the left. Then open the notification you want to customize. If you have logged in as the Procurement Applications Administrator, you should see a link called 'Edit' on the top left side of the page. Once you click that, the notification opens into the Page Composer mode, and you will be able to customize the content as allowed by the Page Composer. Note that you do not need to go to the Administration view (as you can see in your attached document) for this. Simply open the notification from the worklist. You can try this on your internal environment.

Also, If you want to only update the text displayed on the BPM notification and ensure that it is translated, you can do it via the Customize User Interface Text tool. You can also update the text included on the e-mail with the Customize User Interface Text. You must be in a properly configured Sandbox to use the User Interface Text editor tool. It can be accessed from the Navigator > Tools > User Interface Text by an Application Administrator.

This document Extending the Applications for Functional Administrators explains how and when to use the Page Composer and the Customize User Interface Text tool to extend Fusion application pages

Lead Time Feature in Fusion

Uses of Lead Time in Oracle Fusion :

Item level
BPA Level - The lead time defined on the BPA lines are displayed when the user searches and compares items from the catalog.
Min Max -

1. Pre-processing, Processing lead times: they are added to the current date for determining the requisition need by date.
2. Post-Processing lead times: it is added to the Min-max supply cut off date for determining the availability of the supply quantity from the reqs and po supply.

Agreement date is the earliest of these 3 dates: Date when agreemeent was communicated to the supplier, Date when agreement was acknowledged by the supplier, Date when Agreement became live and went under change control.

Thread: Warning when trying to create Purchasing Document Complete Award in R11

After upgrade to Release 11, Customer started getting waring, when they are trying to create Purchase Order from Complete Award in Negotiation. Customer expectation to fix the issue in release 11 as it was working in release10.
Steps:
1. Create Negotiation
2. Received response from Suppliers
3. Manage Negotiation Actions -> Award -> Award Negotiation
4. Apply award to the line
5. 'Complete Award' option
6. Trying to create Purchasing Document and getting getting warning.

'You will not be able to create purchasing documents in the external application because the target purchasing service URL is empty
Do you want to continue?'


The 'Purchasing Documents' field was introduced in Release 11 as part of the award web service feature. For details, please refer to the Whats New document and the Release Training:
http://www.oracle.com/webfolder/technetwork/tutorials/tutorial/cloud/r11/wn/r11_procurement_wn.htm#_Toc443569446

If the 'Purchasing Documents' field is greyed out, it is likely because Purchasing is not set as implemented in the setup offerings and therefore 'Export using web service' is the only option available for purchasing documents creation. Once the target URL is defined for the award service using the 'Configure Negotiation Award Outbound Service' setup task, the warning will not be displayed anymore.
In 'Configure Procurement Business Function' screen 'Purchasing Documents' is available with "Create in Oracle Fusion Purchasing" and "Export using web service". Since this comes under "Sourcing" section.

For the field 'Purchasing Documents' to be enabled, and for you to be able to select 'Create in Oracle Fusion Purchasing', you need to ensure that the offering 'Purchasing' is set to 'Implemented' in the customer instance. On the setup and maintenance page, check the Configure: Procurement page for the Procurement offering. Implementation Status column for Purchasing should be marked as 'Implemented'. 

Multi Attribute Scoring

Could you explain this with an example? I see I can set 'Ranking Method' to 'Multiattribute scoring'. But I'm not sure how this works in a simple example.

How does it calculate if Supplier A offers price 500 with score 10 and Supplier B offers price 499 with score 1?

Answer

When the Ranking Method is set to Multi attribute scoring, the rank is based on price over score (i.e. price divided by score) and the supplier with the lowest price over score is ranked number 1. In the customer's example, since 500/10=50 is lower than 499/1=499, Supplier A is ranked number 1.

In Multiattribute scoring, it uses the line price and line attribute score to determine the rank, requirements are not used in the ranking.

How to change the system time

Requirements -

The system time stamp is a few hours ahead. Can it be set to Pacific Standard Time? If not, what is it showing? and what is the difference between system time and our time (PST).

Solution -

Your production POD is located in Chicago time zone so it shows couple of hours ahead. Please try changing below setups

1. Log in to the Setup and Maintenance (FSM).

2. Launch the task "Manage Administrator Profile Values" and verify that the profile "XLE_ENABLE_LEGAL_ENTITY_TIMEZONE" is set to "Yes".

3. Select the Implementation Project and launch the task "Manage Legal Entity".

If the Legal Entity address is set up, ensure that the appropriate Time zone is also selected. If not, navigate to the "Manage Locations" UI and ensure that time zone setting is properly selected for the location attached to the Legal Entity.

4. Set the server time zone profile (FND_SERVER_TIMEZONE and FND_TIMEZONE) to PST


Thanks

Thursday, July 21, 2016

Self Service Receipt Via PO number or not by Requestor and support Attachment

To Receive other PO's from your user, you should add privilege(RCV_CREATE_SELF_SERVICE_ALL_REQUISITION_RECEIVING_RECEIPT_PRIV) from APM.

Below are the steps how to give the privilege, Please follow and test the scenario

Setup Steps:

1. Login to the APM as Implementation User.

2. Search for any user for whom super user grant has to be provided.

3. Select the user record from the search results and click the folder icon. It will open the user record on the right hand pane.

4. Click on ‘Find Policies’ button

5. System will prompt to choose an application. Select ‘fscm’ and click ‘Ok’ button.

6. Click ‘+’ icon in the ‘Policies for’ section.

7. Click ‘+’ icon in the ‘Targets’ section.

8. System pops up ‘Search Targets’ window. On the ‘Entitlements’ tab, search for the target name: ‘RCV_CREATE_SELF_SERVICE_ALL_REQUISITION_RECEIVING_RECEIPT_PRIV’ (
Create Self-Service All Requisition Receiving Receipt)

9. Search results display the above Entitlement. Select the record from the search result and click ‘Add Selected’. This adds the selected record to the bottom pane

10. From the bottom pane, select the record and click ‘Add Targets’ button.

11. This adds the entitlement back to the targets page. In this page, give some name for this grant, for example: ‘XXX’. Then click ‘Save’ button.

12. With this, the privilege of receiving other users PO/PR has been granted to the user: ‘XXX’


B. Self-Service Receiving Support for Attachments:
Steps to Enable
The Attachments column is hidden in the default table view. To enable the Attachment column, follow the steps below.

  1. Click on the View Menu in the table.
  2. Click the Columns Sub Menu.
  3. Select the Attachments check mark toggle to display the Attachments column.
  4. Alternatively, you can select Show All to display all columns in the table.

Tuesday, July 19, 2016

Punchout Mapping cXml

Part of our procurement setup we have created a number of Item Category Name and linked to Charge account “Expense code” as per below:


Manage Supplier Content Map Sets:


UOM Mapping: This is mapped such


Category Mapping: the supplier has provided a single reference used, which I am attempting the map for 4 different Internal Category name


The system does not allow same External Category to be used more than once

How to Map Supplier Item Number Through Punchout to Item Number in Inventory (Doc ID 227268.1)

Punchout in Fusion Self Service Procurement Explained (Doc ID 1323912.1)

Run the following diagnostic on note if the Punchout is still not working after following the above notes : Punchout Connectivity ValidateDoc ID 1331902.1


Punchout: Directory to place supplier certification file also profile valueWe are doing fresh Fusion Implementation and we need to setup punch out to staples for a direct access to supplier hosted catalog ,cXML option .

1) I have configured content zone and catalog with the URL and credentials that the supplier provided and tested the connection ,however we need to know the directory or file path where the suppliers certification file should be placed in ?

(Punch out set up guide states that " Punchout from Oracle Fusion Self Service Procurement directly to Supplier-Hosted Catalog (XML or cXML), the supplier’s certification authority needs to be on the fusion_trust.jks file in Oracle Fusion Self Service Procurement"

In Oracle Fusion Self Service Procurement, the fusion_trust.jks file should be readable and accessible from the middle tier. If the Oracle Fusion Self Service Procurement implementation has multiple Java Virtual Machines (JVMs), the fusion_trust.jks file should be accessible from all the JVMs. )

2) Also we need to know the values to set up the following profile options for punch out
• POR : Proxy Server Name
• POR : Proxy Server Port

Answer

1) You can check where the jks file is and make sure that certifying authority of the supplier's certificate is part of this jks.

Steps to identify the location of the fusion_trust.jks:
a. Login to WLS console
b. Expand Environment -> Click Servers
c. Click the server which you are interested in -> Navigate to Keystore tab
d. You will find the trust store configured in "Custom Trust Keystore" attribute value.


oracle@syfar06080p05 edgg-test:ADMIN-APPS config]$ nslookup opc-proxy
Server: 10.192.9.101
Address: 10.192.9.101#53

opc-proxy.audc1.oraclecloud.com canonical name = sy3-opc-proxy.audc1.oraclecloud.com.
Name: sy3-opc-proxy.audc1.oraclecloud.com
Address: 10.192.9.102


Punchout setup


SETUP
Navigate: Purchasing -> Catalogs -> Manage Supplier Content Map Sets
(this is to map the UNSPC Codes with the Purchasing Category in fusion)


Values are given as below(In JD Williams DEV Instance):
Catalog:  Office Team
Keywords: Stationery
Supplier: OFFICE TEAM LTD
Domain: DUNS
Identity: JDWIL
Supplier Name: Office Team
Supplier ID: 2010062
Map Set: OFFICE TEAM

Password:  123er4Q